Sending Reports Via Email With VBA
A practical guide to automating report emails from Excel with VBA, using a named table and Outlook to send messages and attachments to a list of recipients in one click.

Xian Hui
23 June 2025
Quick answer
How can you send reports via email automatically from Excel using VBA?
You can automate report emails by writing a short VBA macro in Excel that controls Outlook. Store each recipient, subject, body and attachment path in a named table, then loop through every row to create and send a message. VBA attaches the file, marks the row as sent, and repeats, so a whole batch of reports goes out with one click.
Sending Reports Via Email With VBA
Written by Ng Xian Hui, Founder of Backbone. Originally published on ISCA's Chartered Accountants Lab.
VBA (Visual Basic for Applications) is a programming language and environment embedded within most Microsoft Office products, including Excel and Outlook. This means VBA can automate more than just tasks within a workbook; it can also integrate with other applications, such as Outlook, to streamline processes like sending emails. For accountants who need to share reports regularly, automating email processes can save time, improve accuracy and ensure consistent communication.
In this article, we will explore how VBA can be used to automate the sending of emails directly from Excel. This approach helps maintain a seamless workflow and eliminates the repetitive task of manually composing emails and attaching files.
Key takeaways
- VBA can automate more than just tasks in a workbook; it can integrate with other applications, such as Outlook, to streamline processes like sending emails.
- Automating email processes can save time, improve accuracy and ensure consistent communication.
- Structuring the data properly is essential to reap maximum benefits. Structuring the data in a named table with clear column headers ensures flexibility and scalability, enabling the macro to adapt to changes seamlessly.
What do you need before you start?
To send emails using VBA, you will need to ensure the following:
1. Microsoft Outlook (the classic Outlook) installed
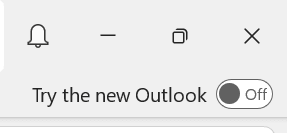
VBA interacts with Outlook to send emails, so Outlook must be installed and properly configured on your computer. Microsoft has released a new Outlook for Windows, which does not support VBA. To ensure that VBA works, make sure the "Try the new Outlook" toggle button in your Outlook is set to Off.
2. Developer tab enabled
If the Developer tab is not enabled, you can follow the steps outlined in Automating the Final Mile of Report Generation to activate it.
Note: macro recording will not work for this task. While Excel's macro recorder can capture most actions performed within Excel, it cannot record inter-application actions, such as those involving Outlook or other programmes.
How do you prepare your data in Excel?
Before diving into VBA coding, it is crucial to prepare your data in Excel so that your macro can dynamically use it to send emails. Here is how to structure your data effectively.
1. Create a table
Set up a worksheet in Excel to include all the necessary details for your email automation. Here is an example of how your table might look:
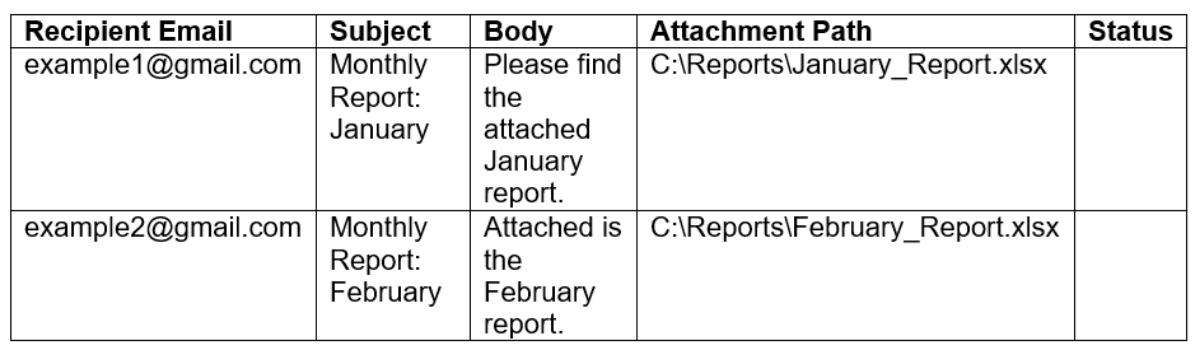
Each column has a specific role in the automation:
| Column | Purpose |
|---|---|
| Recipient Email | Enter the email addresses of the recipients. |
| Subject | Include the subject line for the email. |
| Body | Write the content of the email. |
| Attachment Path | Provide the file path for any attachments. |
| Status | Leave the column blank for now. It will be used later to track the status of the process. |
2. Format the data as a table
To make your VBA code easier to manage, format the data as a table and give it a meaningful name.
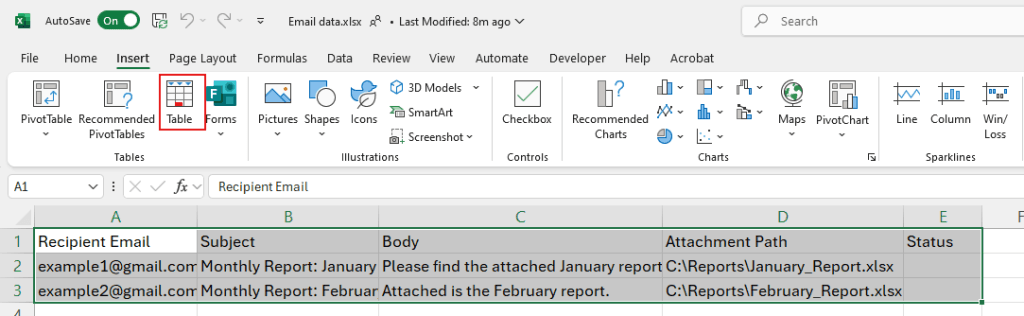
- Highlight the table.
- Format as a table. Go to the Insert tab on the ribbon and click the Table icon (see screenshot).
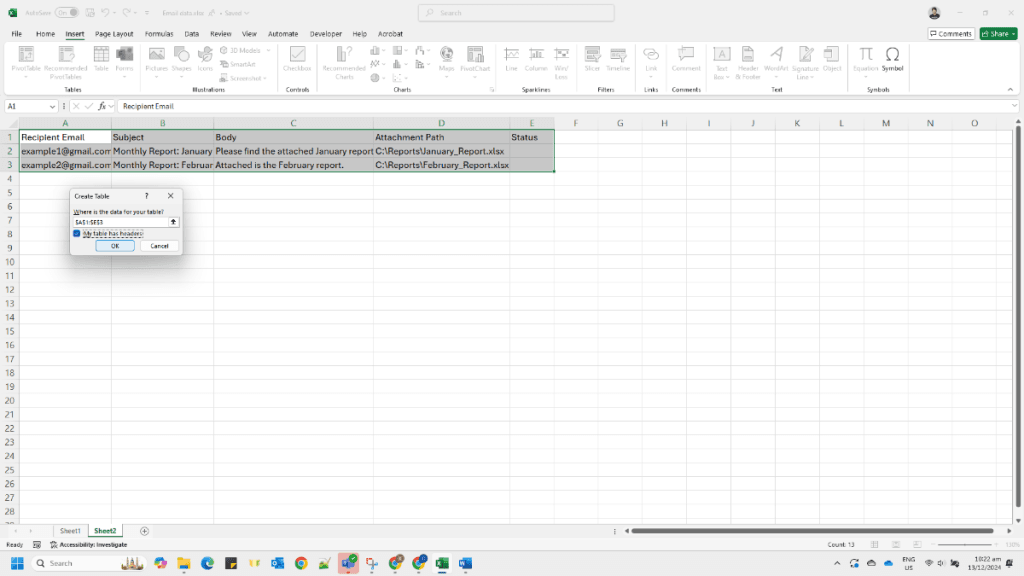
In the dialog box, ensure the range is correct and check the box for My table has headers. Click OK to create the table.
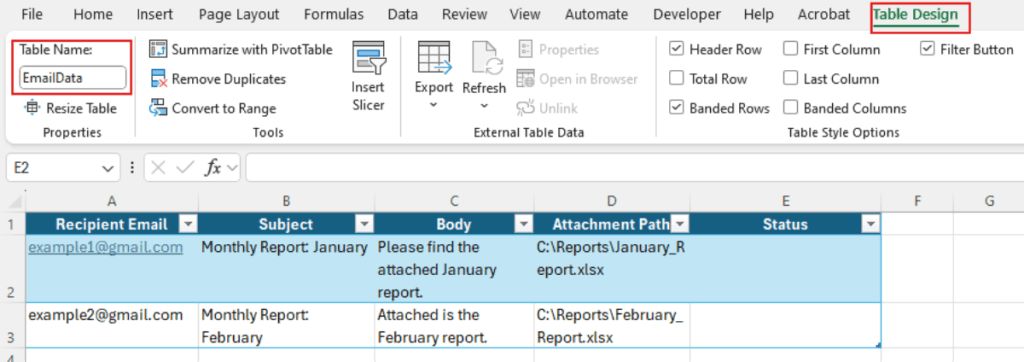
- Name the table. With the table selected, go to the Table Design tab (this appears when the table is selected). Locate the Table Name box in the Properties group (top-left corner of the ribbon). Enter a meaningful name (EmailData) and press Enter.
Why use a named table?
Using a named table like EmailData instead of fixed cell ranges ensures flexibility and scalability:
- Dynamic range: A named table automatically adjusts to include new rows of data when you add them. This eliminates the need to manually update your VBA code for changes in the data size.
- Ease of reference: Named tables and columns make your VBA code more readable and maintainable. Instead of hardcoded cell references, you can reference data by column names, reducing errors and making the code self-explanatory. This is the same idea behind Excel lookup functions, which retrieve values by header rather than by position.
- Future-proof: Even if the structure of your data changes (for example, column order), the code remains intact because it uses column headers, not fixed locations, to retrieve data.
How do you insert the VBA code?
Before you can write or edit VBA code, you need to access the VBA editor. Follow these steps.
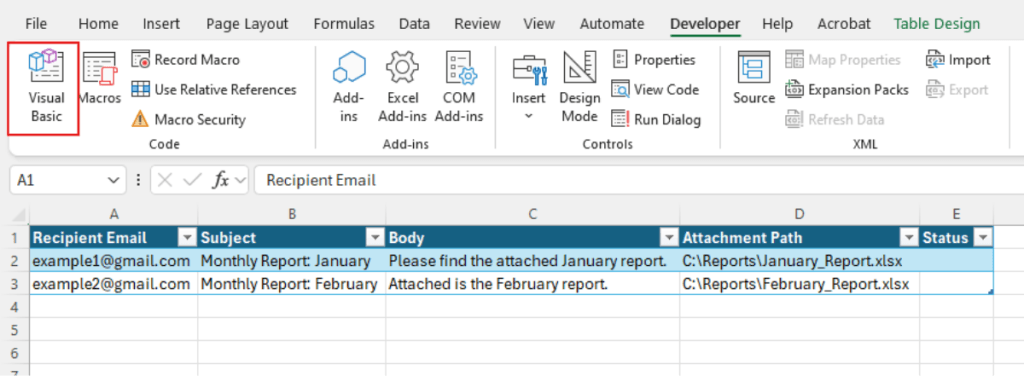
1. Open the VBA editor
You can press the shortcut Alt + F11 to open the VBA editor directly.
2. Insert a new module
To start writing your VBA code:
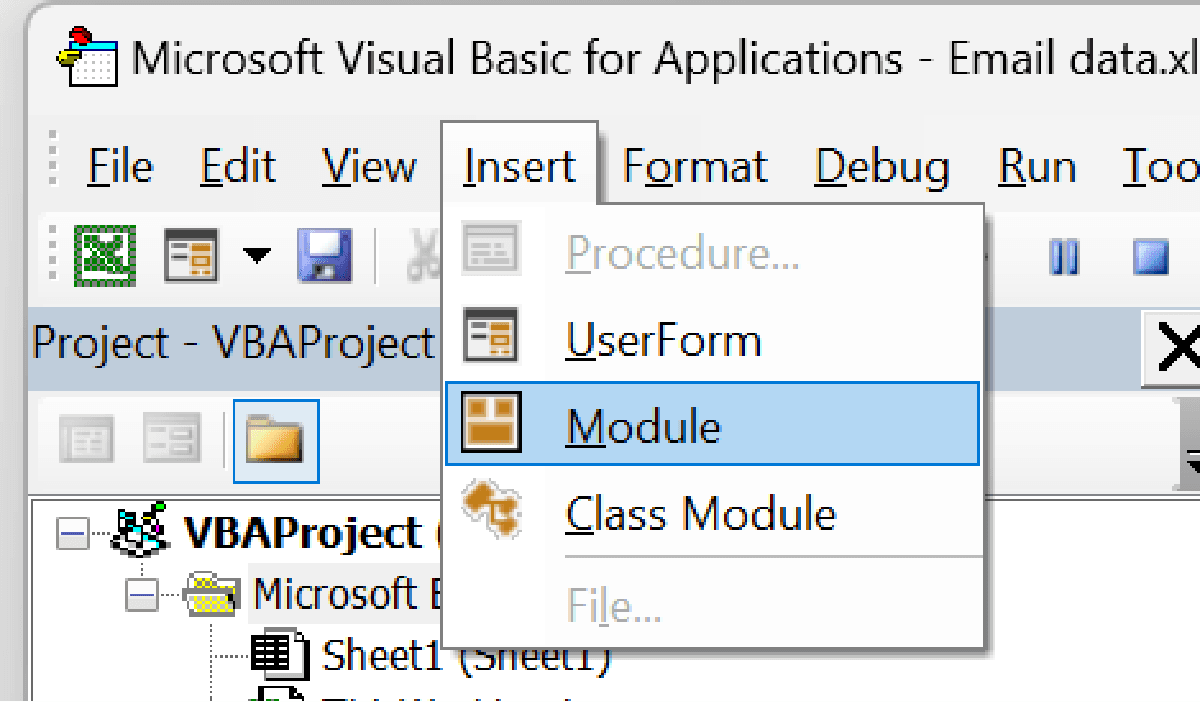
- In the VBA editor, go to the Insert menu.
- Select Module.
- A blank code window will appear where you can write or paste your VBA script.
3. Paste the VBA script below
Sub SendEmails()

    Dim OutlookApp As Object
    Dim OutlookMail As Object
    Dim tbl As ListObject
    Dim row As ListRow
    Dim attachmentPath As String

    ' Initialise Outlook application
    Set OutlookApp = CreateObject("Outlook.Application")

    ' Reference the named table
    Set tbl = ThisWorkbook.Sheets("Sheet1").ListObjects("EmailData")
    ' Replace "Sheet1" with your sheet name and "EmailData" with the table name

    ' Loop through each row in the table
    For Each row In tbl.ListRows
        ' Create a new email
        Set OutlookMail = OutlookApp.CreateItem(0)

        ' Compose the email
        With OutlookMail
            .To = row.Range(tbl.ListColumns("Recipient Email").Index).Value
            .Subject = row.Range(tbl.ListColumns("Subject").Index).Value
            .Body = row.Range(tbl.ListColumns("Body").Index).Value

            ' Attach the file if the file path is valid
            attachmentPath = row.Range(tbl.ListColumns("Attachment Path").Index).Value
            If Dir(attachmentPath) <> "" Then
                .Attachments.Add attachmentPath
            End If

            .Send ' Use .Display instead of .Send to preview the email before sending
        End With

        ' Update the status column
        row.Range(tbl.ListColumns("Status").Index).Value = "Sent"

        ' Clean up the mail object
        Set OutlookMail = Nothing
    Next

    ' Clean up the Outlook application
    Set OutlookApp = Nothing
    MsgBox "Emails sent successfully!"
End Sub
The lines beginning with a single quotation mark are comments; they explain what the code does without affecting how it runs. If you want to review each message before it goes out, replace .Send with .Display so Outlook opens every email on screen first. For a fuller reference, Microsoft publishes official documentation on getting started with VBA in Office.
How do you run the macro?
1. Insert a button
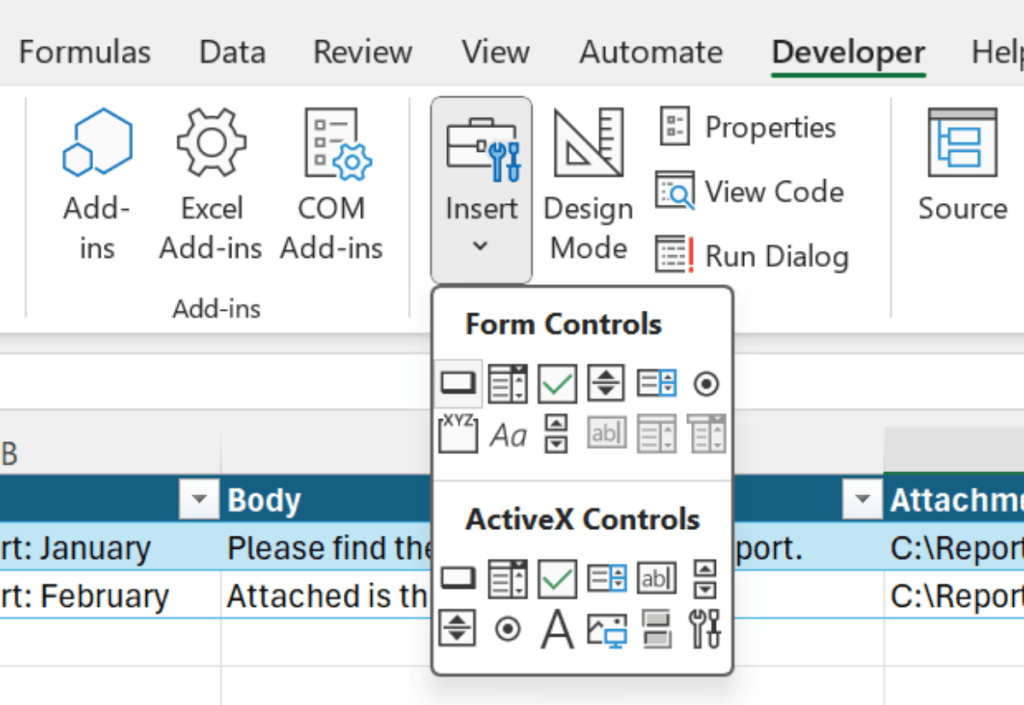
In the Developer tab, click on Insert, then select the Button (Form Control) icon from the dropdown menu.
2. Place the button
Click anywhere on your spreadsheet to place the button. A dialog box will appear asking you to assign a macro.
3. Assign the macro to the button
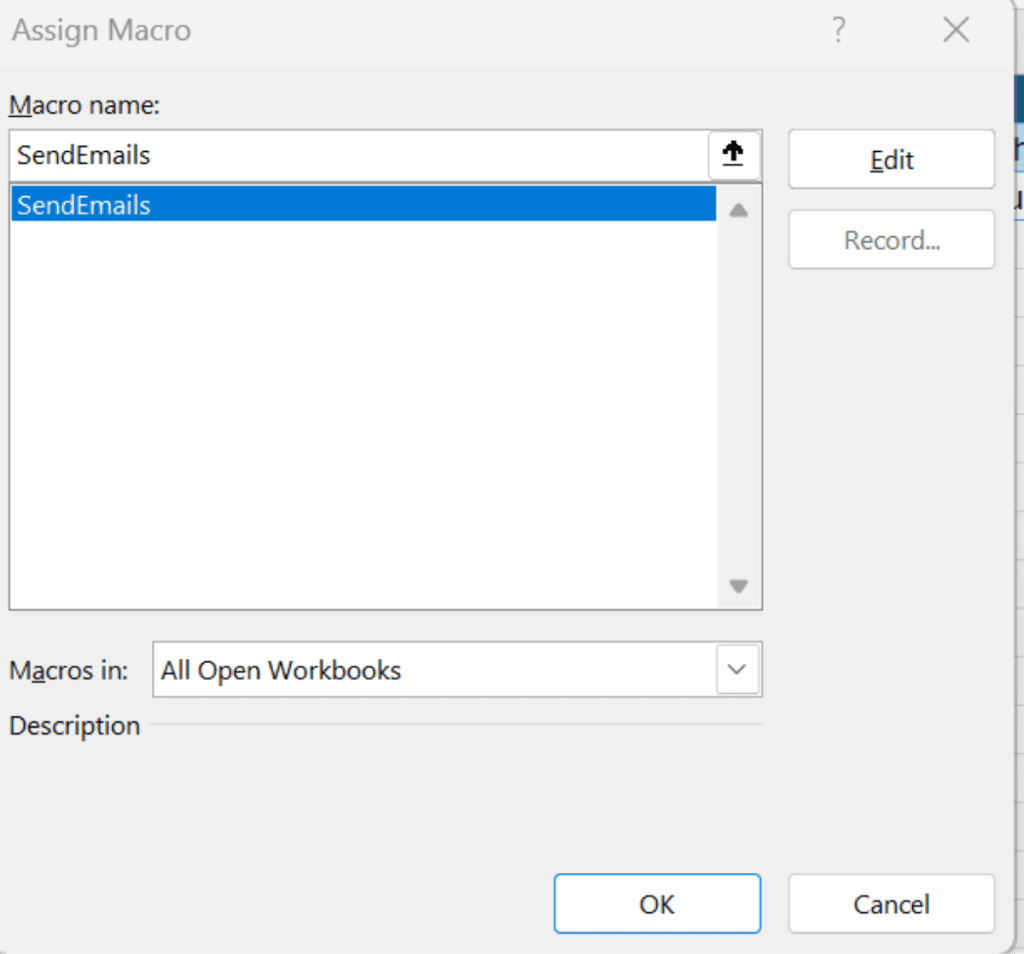
Select "SendEmails" to assign the macro to the button. Click OK to link the macro to the button.
4. Edit the button text
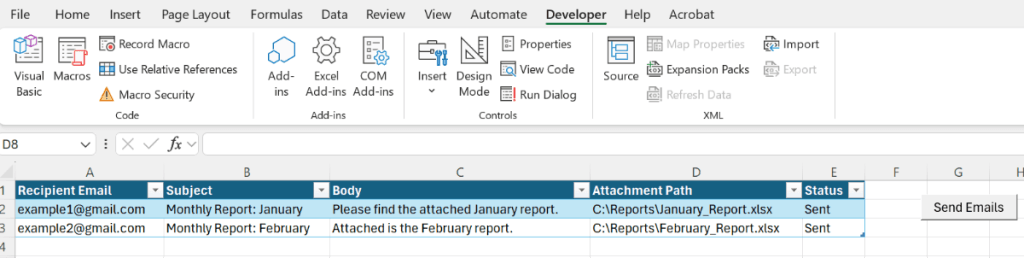
By default, the button will have generic text like "Button 1". To change it, right-click on the button and select "Edit Text". Enter a descriptive name for the button, such as "Send Emails".
5. Run the macro
Click the button to execute the assigned macro.
Conclusion
Automating email sending with a VBA macro streamlines your workflow, saves time and minimises manual errors. By structuring your data in a named table with clear column headers, you ensure flexibility and scalability, enabling the macro to adapt to changes seamlessly. The same structured-data habit pays off elsewhere too, such as when you streamline consolidation with Power Query. Whether you are sending financial reports, invoices or updates, this approach simplifies the process, making repetitive tasks effortless.
Frequently asked questions
This information has been prepared for general informational purposes only and is not intended to be relied upon as accounting, tax, or other professional advice.
Related articles
articles
Automating the Final Mile of Report Generation
A beginner-friendly guide to using VBA in Excel to automate the final mile of report generation — decoupling a finished report from its working file so it is accurate, well formatted and ready to share.
articles
Artificial Intelligence in Excel
How accountants can push Excel further with artificial intelligence, from built-in tools such as Flash Fill and Analyze Data to third-party AI services connected through APIs and add-ins.
articles
Dynamic Array Formulas in Excel: Unleashing the Power
How Excel dynamic array formulas such as FILTER and XLOOKUP spill results across cells, so accountants can build scalable, error-resistant templates and audit working papers.