Automating the Final Mile of Report Generation
A beginner-friendly guide to using VBA in Excel to automate the final mile of report generation — decoupling a finished report from its working file so it is accurate, well formatted and ready to share.

Xian Hui
23 June 2025
Quick answer
How can you use VBA in Excel to automate the final mile of report generation?
VBA lets you record and run a macro that copies a finished report out of its working file and pastes it into a clean workbook as column widths, formats and values only. This decouples the report from the source data and formulas, so each period you produce an accurate, properly formatted file that is ready to distribute without repeating the manual steps.
Automating the Final Mile of Report Generation
Written by Ng Xian Hui, Founder of Backbone. Originally published on ISCA's Chartered Accountants Lab.
Visual Basic for Applications (VBA) in Excel is a programming language that lets you automate tasks, customise workflows and create functions tailored to your own needs. It is particularly useful for accountants who deal with repetitive tasks such as data manipulation, report generation and financial statement preparation. With VBA, manual effort is reduced, so you can improve both efficiency and accuracy — much as the right Excel lookup functions do for data retrieval.
In this article, we will explore a simple VBA use case: exporting a report from a working file.
Key takeaways
- VBA in Excel lets you automate tasks, customise workflows and create functions tailored to specific needs. It reduces manual effort and improves efficiency and accuracy.
- VBA can decouple the output or report worksheet from the working file. Automating this process avoids mistakes, saves time and ensures a properly formatted report that is ready for distribution.
What is the final mile of report generation?
A typical working file starts with raw data, undergoes complex computations, and ends with a final output in a separate worksheet. Sharing the full file can expose unnecessary data and computation logic.
The "final mile" here refers to the step of decoupling the output or report worksheet from the working file for distribution. This involves removing formula linkages to ensure that the final report is independent of the original data and calculations. While performing this task once a month may not take much time, doing it repeatedly can quickly become tedious and error-prone. Automating this process with VBA helps avoid mistakes, saves time, and ensures the report is properly formatted and ready for distribution.
Where is the Developer tab in Excel?
If you do not see the Developer tab in your Excel menu, follow these steps to unhide it:
- Click on the File tab.
- Select Options at the bottom of the menu.
- In the Excel Options window, choose Customize Ribbon.
- On the right side, under Main Tabs, tick the box next to Developer.
- Click OK.
The Developer tab should now be visible in your Excel ribbon.
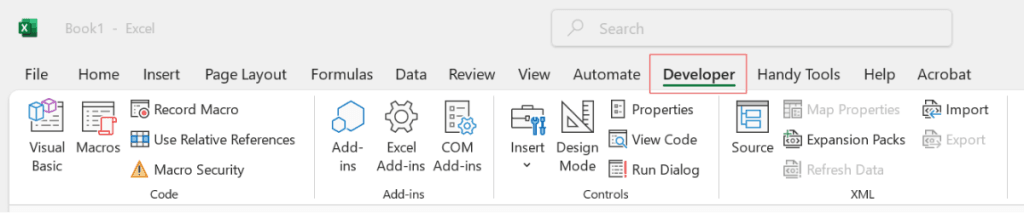
How can you programme a macro?
To programme a macro, you can write the VBA code from scratch, use AI to help, or simply do a macro recording. My own journey into VBA coding began with macro recording, which I believe is the same for many Excel users who do not have a technical background.
For a beginner, the process typically follows these steps:
- Plan: It is important to plan your steps before you click the recording button, so you do not record unnecessary actions. First, clearly outline what you want to automate. Break it down into specific steps or actions. Then do a quick run-through of the tasks manually, to make sure you know the exact steps required and to avoid mistakes during recording.
- Record: Once you are confident with the process, hit the Record Macro button and perform the actions efficiently.
- Review the code: Once the recording is done, you can review the code generated by Excel.
- Amend if necessary: The recorded code may not always be perfect or fully optimised. This is where you can make adjustments to improve efficiency, remove unnecessary lines or add new functionality. You can also enhance the recorded macro by adding conditions, loops or error-handling logic.
This process lets you start automating simple tasks, even without a programming background. Over time, you will gain more confidence to edit and improve your VBA code.
How do you start recording?
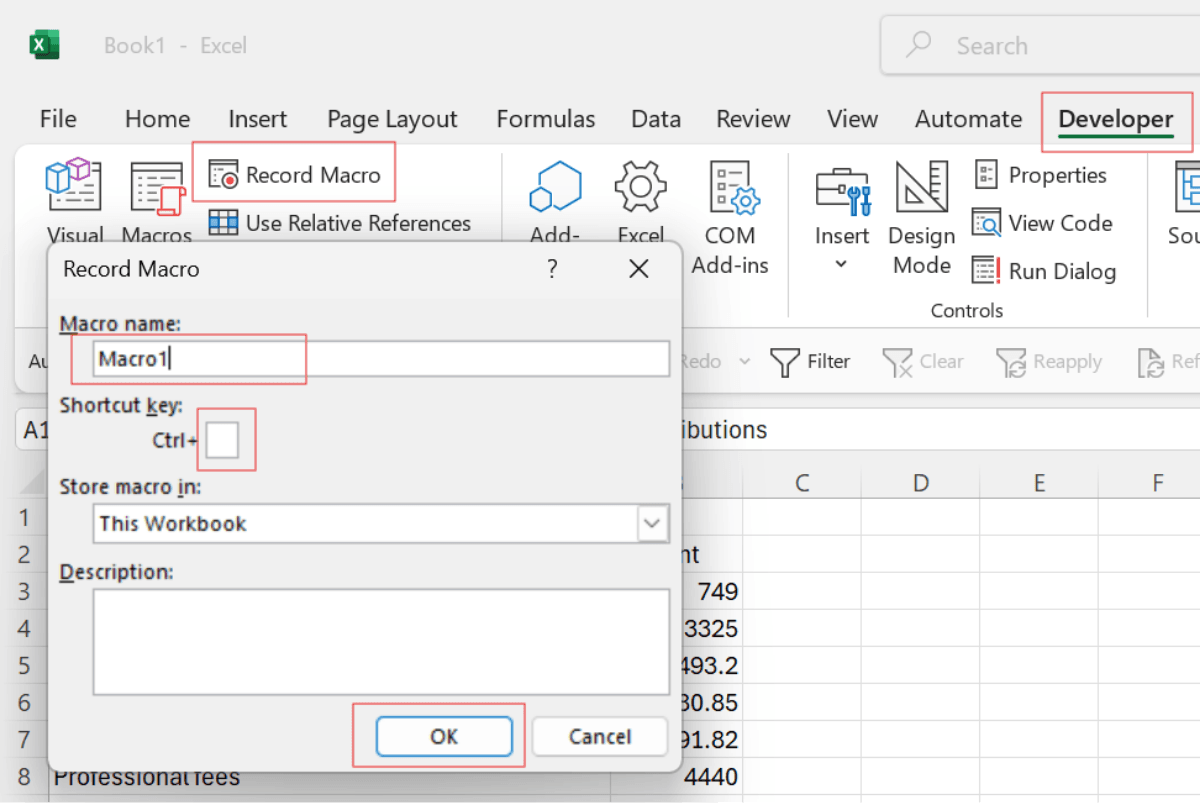
- Go to the Developer tab and click on Record Macro.
- Give your macro a name in the Macro name field.
- (Optional) You can assign a shortcut key to the macro by entering a letter in the Shortcut key field.
- Click OK to start recording.
From this moment onwards, your actions in Excel will be recorded, including scrolling down the worksheet.
What are the steps to export the report?
The whole point of the final mile is to move the finished report into a clean workbook that carries no links back to the source. The table below summarises the actions to record, and the detailed steps follow.
| Step | Action | Purpose |
|---|---|---|
| Select and copy | Select the report range and press Ctrl + C | Captures the data and its formatting |
| Add a workbook | Press Ctrl + N for a new workbook | Creates a clean destination file |
| Paste column widths | Paste Special > Column Widths | Preserves the original layout |
| Paste formats | Paste Special > Formats | Preserves colours, borders and fonts |
| Paste values | Paste Special > Values | Removes formulas and source links |
1. Select the range of cells: Start by selecting the data you want to copy and distribute. This could be a specific table or a range of cells in your current workbook that you want to transfer.
2. Copy the range: Once the range is selected, copy it using Ctrl + C or by right-clicking and selecting Copy. This copies both the data and its formatting.
3. Add a new workbook: Open a new workbook to paste the copied range. You can do this by pressing Ctrl + N or by selecting File > New.
4. Paste column widths: First, paste the column widths to maintain the layout of the original data. Go to the new workbook, right-click where you want to paste, and select Paste Special > Column Widths.
5. Paste format: Next, paste the format of the copied range, such as colours, borders and fonts. Right-click again and select Paste Special > Formats.
6. Paste value: Finally, paste just the values of the data to ensure that no formulas or links to the original workbook are carried over. Right-click and select Paste Special > Values.
7. Stop the recording: Go to the Developer tab and click Stop Recording. This finalises your macro and saves the steps you performed, so you can reuse them anytime.
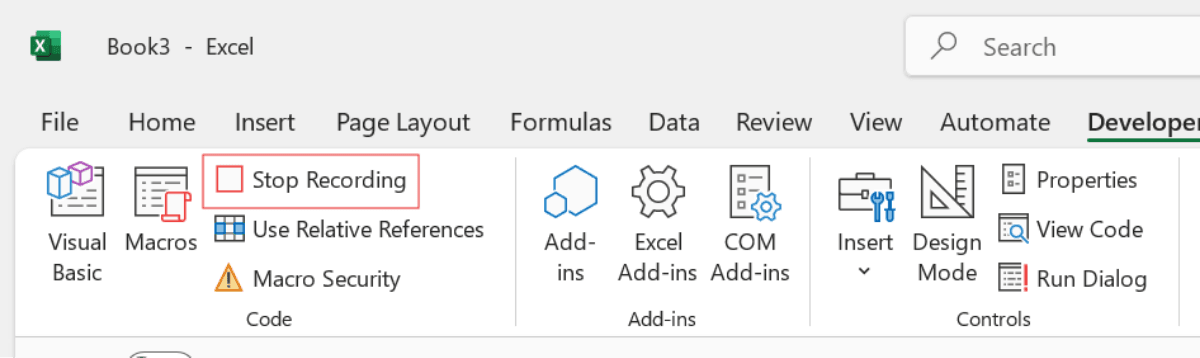
This method ensures that the data in the new workbook is formatted identically to the original and has only the required values, without any unnecessary links or formulas from the source file.
How do you review the recorded code?
To review the recorded macro code, follow these steps:
- Go to the Developer tab and click on Macros.
- Select the macro you just recorded.
- Click Edit.
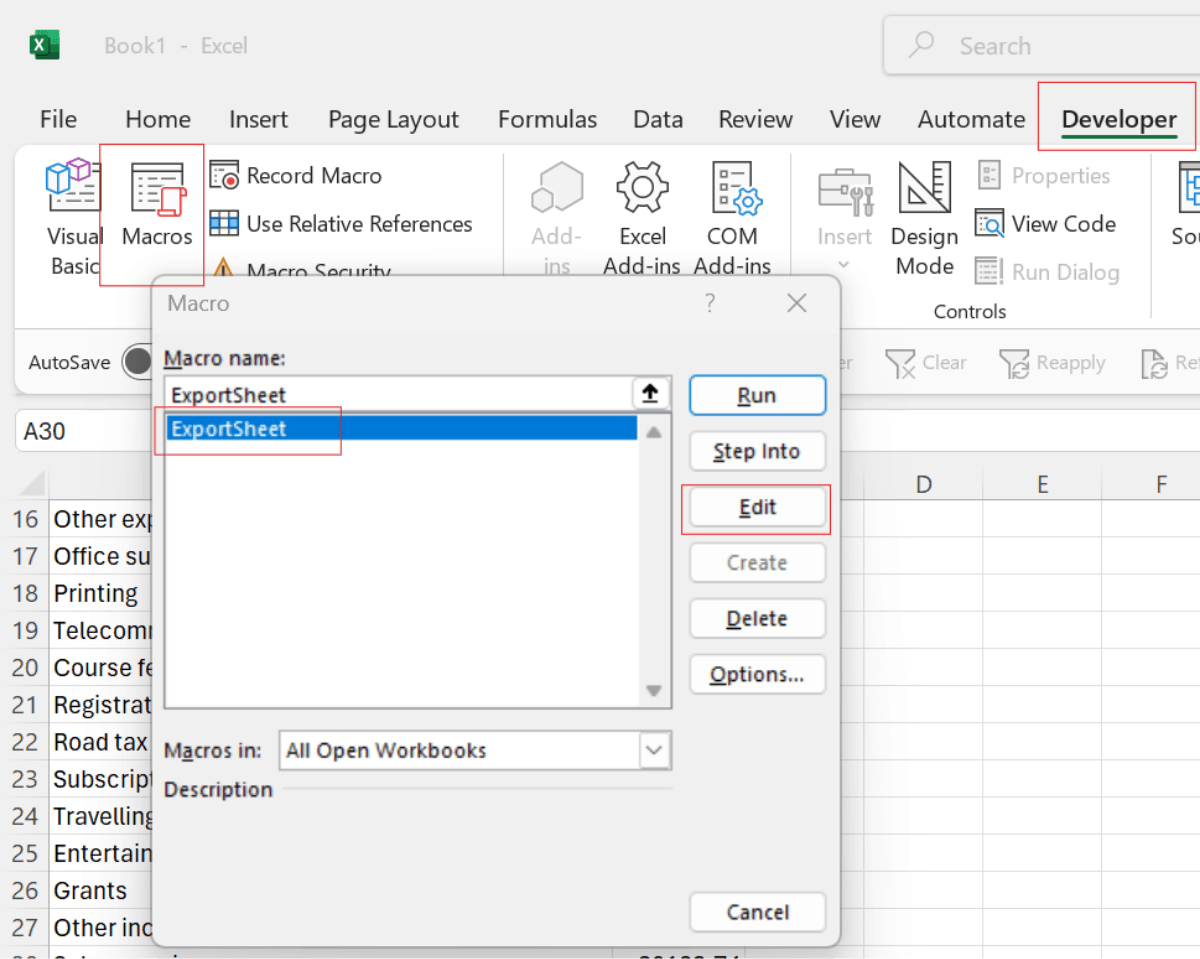
This will open up the VBA Editor:
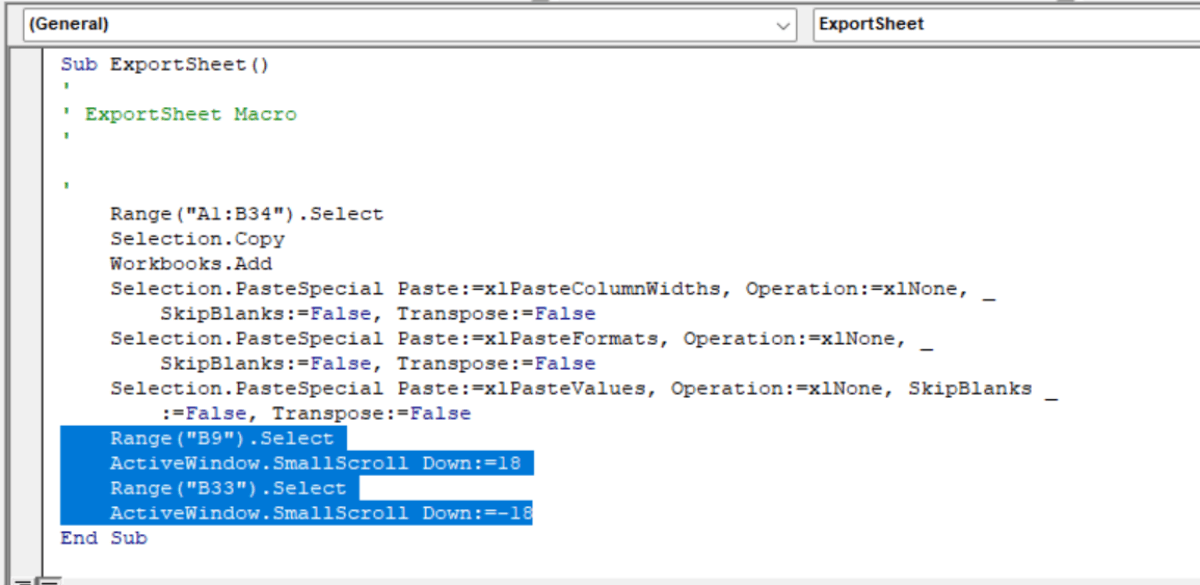
This is what I have. How about you?
VBA code is very readable. Even with no prior programming knowledge, it is not too difficult to understand what the code is trying to do. It is written in plain English, though the grammar may seem a bit strange.
The last four lines of my code are about selecting cell B9 and a bit of scrolling, then selecting cell B33 and scrolling up. These are not necessary, so I will delete them.
The code should work, but if you want to make it more flexible, consider this:
Sub ExportSheet()

Dim newWorkbook As Workbook

' Force calculation on the current sheet
ActiveSheet.Calculate

' Copy the used range of the current sheet
ActiveSheet.UsedRange.Copy

' Add a new workbook
Set newWorkbook = Workbooks.Add

' Copy column widths
newWorkbook.Sheets(1).Range("A1").PasteSpecial Paste:=xlPasteColumnWidths

' Copy formats
newWorkbook.Sheets(1).Range("A1").PasteSpecial Paste:=xlPasteFormats

' Copy values
newWorkbook.Sheets(1).Range("A1").PasteSpecial Paste:=xlPasteValues

' Clear the clipboard
Application.CutCopyMode = False

End Sub
The text behind single quotation marks are comments. They are a good and recommended way to explain what the code does without affecting its execution. Adding comments helps others — and your future self — understand the code better and maintain it more easily. It is a best practice, especially for complex code. For a fuller reference, Microsoft publishes official documentation on getting started with VBA in Office.
What are the limitations of macro recording?
Recorded macros in Excel are easy to create but have limitations. They produce inefficient, linear code, capturing unnecessary actions, and lack the flexibility to handle dynamic data. Because they cannot use control structures such as loops or If statements, recorded macros follow a strict sequence, making them unsuitable for complex tasks that require decisions or repetition. They also lack error handling and are harder to maintain or optimise.
Conclusion
Efficiency in the long term starts with a small investment today. Many resources are available to help you enhance work efficiency with VBA — from classes to forums and documentation — helping you move from manual tasks to automation. Freeing yourself from repetitive work is also part of a wider shift in the accountant's role and its future, where judgement matters more than manual processing.
Frequently asked questions
This information has been prepared for general informational purposes only and is not intended to be relied upon as accounting, tax, or other professional advice.
Related articles
articles
Sending Reports Via Email With VBA
A practical guide to automating report emails from Excel with VBA, using a named table and Outlook to send messages and attachments to a list of recipients in one click.
articles
Artificial Intelligence in Excel
How accountants can push Excel further with artificial intelligence, from built-in tools such as Flash Fill and Analyze Data to third-party AI services connected through APIs and add-ins.
articles
Dynamic Array Formulas in Excel: Unleashing the Power
How Excel dynamic array formulas such as FILTER and XLOOKUP spill results across cells, so accountants can build scalable, error-resistant templates and audit working papers.